React Player Input (High Dive)
Prologue
This is the first in a new series of articles (covering a variety of aspects of my games) that are called high dives.
Whilst deep dives are more technical and really descend into the depths of a subject. High dives are more focused on concepts & design and don’t venture too far below the surface.
Background
Player input (for the purpose of this article, that’s the logic behind translating screen touches into game actions) is something that I knew would be important when developing React. It’s a game where dozens of fast-moving user interactable objects can be on-screen at once, in close proximity to each other.
The importance of this logic became evident even during the prototype phase, where the full pace of the game had yet to be explored. From day one, all player input logic was encapsulated in a class called PlayerInputManager and this went through a number of iterations during development.
Version 1 was designed for the prototype and early development phase. Version 2 was designed when the full gameplay pace was unlocked during World 1 development. Version 3 was designed for the more complex World 2 levels, proved itself in the beta phase and ended up in production.
The Problem
When a player touches a device screen, Unity ultimately reports that an X,Y point (representing pixel coordinates) has been touched. That input will start with the physical screen registering the hit and end with Unity reporting detailed characteristics of the input. Let’s dig a little deeper into what actually goes on behind the scenes.
A rough breakdown of the input layering looks something like this…
The hardware layer (the physical screen and any hardware based controllers)
The operating system layer (including potentially gaming SDK’s and drivers)
The game engine layer (in this case Unity and the Input class)
The game layer (that would be React and the PlayerInputManager)
This is a simplified explanation. In the real world it’s likely further complicated by different hardware & operating system combinations. One screen or controller could register the input differently to another. One operating system could interpret the input differently to another. One version of Unity could translate the input differently to another.
So how does this affect gameplay?
Before continuing it’s worth noting that some of the visual examples in this article are exaggerated. This is intentional as they were designed to clearly highlight the underlying issue, hopefully making it easier to understand.
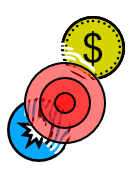
Looking at Example 1 below (where the red dot represents the X,Y input coordinate) which one is correct? Well the answer could actually be all four, dependant on the hardware & software configuration. There are just too many variables out of our control to know.


Now let’s introduce a Gold Coin that a player has technically hit (a) and see how that variation (as if the player were on different devices) could create a problem for us and the player…


(a) Coin or Powerup hits in React range from partial to full coverage (of whatever has been hit)
It’s clear to see that whilst the player has clearly hit the Coin with their finger (in every scenario) only Example 2.4 would have resulted in an actual hit.
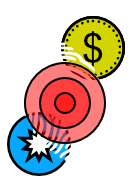
Now let’s turn that around to have a fixed hit position and move the Coin (as if the player had hit it differently on the same device)…


Again, we can see the same problem. The player has hit the Coin with their finger (in every scenario) but only Example 3.4 would have resulted in an actual hit.
The end result would be very inconsistent gameplay and a negative player experience. So how can we address this issue?
Step 1 - Filter the Inputs
Unity is able to report multiple inputs for devices that support this feature. Early touch devices mainly supported only a single (or a few) simultaneous inputs. Almost all modern touch devices support many simultaneous inputs.
During development I experimented allowing the player both single & multiple inputs. Whilst single inputs felt too restrictive (and ruled out playing multi-handed) multiple inputs (three or more) felt unnecessary and could aid cheating in my opinion (b) so I finally settled on two inputs, which allows for both single or double handed playing.
(b) That said, expert players might appreciate the challenge and a co-op mode could be an interesting addition. Both are on the possible future enhancements list.
Unity will also report the lifetime phase of each input. Those phases are input started (finger makes contact with screen) input moved (finger is moved from its original position) and finally input ended (finger is removed from screen)
For React we’re only interested in the start position where the player first made contact with the screen. Moving your finger (whilst pressed on the screen) over a Coin or Powerup will not register them as hit. Likewise, lifting your finger (from the screen) will not register as a hit either.
So the PlayerInputManager checks only the first & second inputs that have started, whilst all other inputs are ignored.
Step 2 - Contact Patch
Looking at Examples 1, 2 & 3 above it’s clear that a single point of contact is just not going to be good enough, but what about a contact patch? Something that is more representative of the screen area the player has touched.
Whilst some devices contain displays & controllers that support (physical) contact patches, these are few in number and often not supported consistently across all software layers. For example, one operating system (or version) may support it, but not another.
But it isn’t difficult to calculate our own (logical) contact patch that’s somewhat representative of the (physical) contact patch.
To calculate the size of this logical contact patch, first we need a set of data points obtained from a single device. The data points (in this case) will be a variety of finger presses of different sizes. The single device will mean they’re obtained from a stable reference.
To obtain the data points I added some debug code to draw a circle wherever player input was detected. The circle was adjusted (for all the different finger presses) until it was just about visible around the edges of each finger and the result noted. I then averaged out the results and arrived at a value of 2.6 Unity units (c) on the device in question.
(c) Unity units are dependant on a number of variables, so your results may vary.
Now we have the average units of our contact patch, we need to scale it at runtime to each players device. To-do this we can divide the screen height (Screen.height) with the number of dots per inch (Screen.dpi) with the result being the screen height in inches.
We can then take both the contact patch units & screen height in inches and calculate the contact patch radius (d). Ultimately this means the smaller the screen, the larger the radius. You could argue that this gives players on smaller screens an advantage, but the smaller screen itself is a disadvantage and mostly cancels out any advantage gained in my opinion.
(d) React supports operating systems where the screen height can change frame to frame. For example, the app can run in windowed mode on Windows. So the contact patch radius has to be calculated on each and every input.
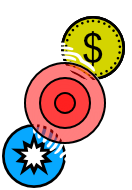
The final result is Example 4.1 below and we can now see that re-running the Example 2 scenarios, this (logical) contact patch would register a hit on the Gold Coin every time. Great!


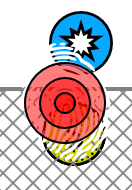
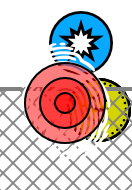
But now that we’re dealing with a contact patch (rather than a single point) there is a high probability that multiple Coins or Powerups will fall within that contact patch. Example 5 below shows this to good effect. In these scenarios, what should the game do?


Register either the Coin or Powerup as hit? If so, which one? How about registering both of them in a single hit?
I eventually decided that one player input should result in one hit. Given the fast speed at which React runs, players tend to home in on one Coin or Powerup at a time. Maybe a few expert players could home in on multiple Coins or Powerups, but in my experience this rarely happened.
But how to decide which Coin or Powerup to hit? I did consider using distance from the original player input position, but given the inconsistency with that data point (see Example 1) I felt it could still result in a less than ideal player experience.
Step 3 - Tiers
Ultimately I decided on a three Tier (ring) system, as shown in Example 6 below. Working from the small inner Tier 1 to the large outer Tier 3, all Coins or Powerups that fall within each Tier are processed as a group. As soon as a hit is detected in the bounds of a Tier, no further Tiers are processed and the object hit returned to the GameManager
The two inner Tier units are based (but not scaled) on the original Tier 3 units. So whilst the Tier 3 units are 2.6, the Tier 2 units are 1.4 and finally the Tier 1 units are 0.5
Example 6.1 would process Tier 1 first and detect the (Blue) Destroy Powerup as the only object within its bounds. It would therefore determine that the Powerup was the object hit and return this to the GameManager
Example 6.2 would process Tier 1 first but find no Coins or Powerups in its bounds. It would then move onto Tier 2 and detect the (Blue) Destroy Powerup as the only object within its bounds. It would therefore determine that the Powerup was the object hit and return this to the GameManager
Example 6.3 would process Tier 1 first and find no Coins or Powerups in its bounds, then do the same for Tier 2. It would finally move onto Tier 3 and detect both the Gold Coin and (Blue) Destroy Powerup within its bounds. Which then presents us with another problem.
Step 4 - Prioritising
Example 7.1 below shows our worst case scenario. There are no Coins or Powerups in Tier 1, so processing will move onto Tier 2. In that Tier one Coin & two Powerups will be detected, so which one do we indicate as hit?
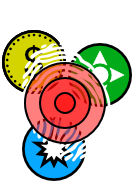
After some thought I decided on the following order when prioritising multiple hits, as I felt this was fairer to the player…
Coins
Bonus Powerups (that help you)
Penalty Powerups (that hinder you)
Using this logic the PlayerInputManager would detect in Example 7.1 that the Gold Coin in Tier 2 was the object hit.
Finally using Example 7.2 below, the PlayerInputManager would detect no Coins or Powerups in Tier 1 & 2, but that Tier 3 contained two Powerups. Again using the above logic, the (Green) Increase Size Powerup would be detected as the object hit (because it’s a bonus powerup)

Step 5 - Blockers
The final piece of the jigsaw are blockers. In the case of React, that means props that are deliberately designed to block players from hitting Coins or Powerups. They are used extensively in World 2 and in-fact every Coin in Level 2.1 (Don’t Blink) is permanently behind a blocker. You’ll have to play the game to work out how to hit them!
Blockers are achieved by using Unity’s layering system. In terms of Coins, Powerups & Props each object is assigned to one of three layers (in visual order, back to front)
Background Props (are drawn behind Pickups)
Pickups (i.e. Coins or Powerups)
Foreground Props (are drawn in-front of Pickups and are designated blockers)
Example 8.1 below shows a player hitting a Gold Coin behind a blocker. The mesh guard is from Level 2.6 (Pincoin Wizard) and any Coins or Powerups that fall entirely behind the mesh are unable to be hit. So in this scenario, although the Gold Coin is in Tier 1 it will be ignored as it’s behind a blocker. The PlayerInputManager will eventually detect the (Blue) Destroy Powerup in Tier 3 as the object hit.
Finally Example 8.2 below shows a player hitting a Gold Coin when it’s (just) partially visible behind a blocker. In this scenario the PlayerInputManager will detect the Gold Coin in Tier 2 as the object hit.
Scalable Solution
One of the other benefits of this approach was its scalability across multiple input types.
For ease of use during development, I allowed React to be played with a mouse (an option that carried through to the production version). Whilst it’s harder to play (for all but real mouse experts) mouse input works almost the same way as touch input in Unity. Meaning when the player clicks the mouse button, the resulting X,Y point is fed into the PlayerInputManager with the same logic (and result)
To aid with testing, debug builds of React also included an Auto Play mode. This was used to soak test the core gameplay engine for hours on end to detect crashes. Some basic logic to (roughly) locate pickups was added (along with configurable skill factors) and the resulting X,Y point was again fed into the PlayerInputManager with the same logic (and result)
But that’s an article in itself and one that’s on the list to explore further down the line.
Final Thoughts
So that is how player input is processed in React although there’s far more to the PlayerInputManager than is covered in this article.
The first version ultimately turned out to be a long way from where it needed to be. Coin or Powerup touches required almost full contact to register as a hit, and the more dynamic World 1 levels often resulted in a frustrating player experience.
And whilst the third version finally resulted in a far superior player experience (and has been proven in the field) it’s still not perfect. In-fact the process of writing this article alone (several years later) made me re-think some of my original design & development decisions.
Possible future enhancements include further accuracy & reliability improvements and memory & latency optimisations.
Whilst some of this article is specific to React, the idea was to keep it high level and generic in its explanation. I see no reason why most of the concepts described here can’t be used in your own games. If you do, I would love to hear about it.
Hopefully this has article been easy(ish) to understand and has given you (the player or another developer) some insight and appreciation into React player input.
It was the culmination of many weeks work and equally many months testing & balancing. All in the life of an independent game developer.
David
Article History
11th Aug 2022: Published